This comprehensive Ice Dams Guide covers the causes and effects of ice dams as well as prevention methods.
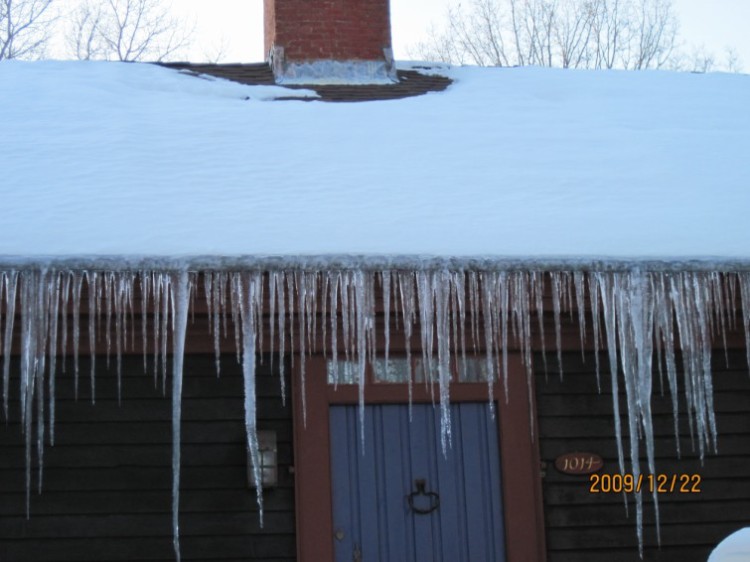
The winter is in full swing and most roofs in the northern states, as well as all of Canada are covered in snow. While most of these roofs don’t leak when it rains, they will leak in the winter, when the snow and ice are on the roof. Many homeowners are experiencing an ice build-up along the drip edge of their roofs, and this build-up is called Ice Dams. Ice dams can look very innocent, but they can pose big problems for your home, as well as your well being. From a simple icicle falling on you, to a complicated and expensive removal of mold growth in your attic, which can cause asthma and other respiratory issues.
If you have ice dams on the roof of your house, you may get rid of them yourself (below we will explain the most efficient way to remove them) or hire a contractor to do it for you – you can find local roofing contractors. Trying to remove ice dams yourself can be dangerous, so we do recommend hiring a professional for the job.
What causes ice dams?
Ice dams are caused by a combination of poor roof ventilation, and inadequate attic insulation. The basic process goes as follows:
- Due to poor insulation the warm air from inside your home escapes into attic space.
- Because the roof is not ventilated, or has poor ventilation, the warm air cannot escape from the attic, so it starts warming up the roof.
- When snow falls on the roof, it begins to melt, as roof temperature is above the freezing point.
- The melted snow turns into water, which runs down the roof, and when it reaches the overhangs, which are not heated at all or not as much as the rest of the roof, water freezes along the edge, forming ice build-up.
- As ice build-up along the edge grows, in turns into a barrier, which prevents the melted water from going over – hence the term Ice Dam.
- As more melted water hits the ice dam, it begins to “pool” and has nowhere to go, but under the shingles above it – see the diagram below.

Effects of Ice Dams
Ice dams are costly to have and costly to eliminate, but the sooner this issue, the more economical it will be. Here is a summary of the ways you are losing money due to ice dams:
- Your roof leaks, so you have interior damages, which need to be fixed.
- Your roof has to be fixed.
- Your roof deck and framing will rot and will need to be fixed.
- You are losing heat, which means you are paying money to heat unused attic space and to melt the snow on the roof – a very expensive and unproductive way to spend your money.
- Ice dam leaks dampen (wet) your wall insulation, reducing its insulating properties, which means you have to spend even more money on heat.
- If unchecked, the damages caused by ice dams can cost you thousands of dollars to repair, as well as hundreds in lost heating costs.
If you let the ice dams problem go for a prolonged period of time, your attic space may experience mold growth, which can cost as much as $10,000 to remove, and a home insurance company may often deny coverage, because you did not take steps to resolve the problem (negligence).
Prevention – How To Stop Ice-Dam Roof Leaks
Quick DIY methods:
First and foremost – if you attempt to fix the ice dams yourself – do understand that it can be very dangerous. Use utmost care, and also spend an extra $20 for a ladder stabilizer – it will make your job much easier and safer. In any case, we assume no responsibility if you injure yourself or others – do it at your own risk.

One of the easiest and quickest ways to get rid of ice dams is to use socks filled with calcium chloride or rock-salt (sodium chloride), and to place them along the roof edge, as well as around chimneys and skylights to melt the snow. While this method works, it requires constant replacement of rock salt in the socks, and having to climb up the ladder multiple times. This is dangerous in the winter, especially that most homeowners do not have a ladder stabilizer, so the ladder can easily slide left or right.
Also, note – while calcium chloride should be safe to use on most roofs, we recommend you contact your manufacturer to make sure that it’s safe to use it on your particular roofing product.
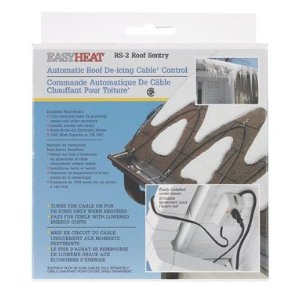
 Additionally, you can use special heating cables along the roof edge to melt the ice dams, before they form. This is a more common method, and is used more often, as it does not require you to constantly go up and down the roof all winter long. There are a few downsides to this method. First, these cables are expensive to install. Second, most roofers will install them by simply placing a screw (which holds down the heating cable) through the roof, and this can cause leaks. Another drawback is that you are actually fighting a heat and energy loss problem with more heat and energy waste, instead of solving the problem, which causes ice dams.
Gutter heat cable cost about $80 for a 160 feet long cable, use 120 volt AC current, and you can rather easily install them yourself. If you decide to install them yourself, you will first need to get rid of the ice on your roof. Then, when you actually go to attach the cables, try to mount the hangers under the shingle tabs, so that your roof would not leak through the fasteners.
More or Less Permanent Solutions to Ice Dams
The most common method to fight ice dams and the one which is required by building code in most northern states and in Canada, is to use Ice & Water barrier along the roof edge, & at least two feet up, past the exterior walls of the house. This means that in most cases, a contractor will install a 3′ wide roll of ice and water along roof eaves, and shingles over them.
Here is the catch though – to save money, most roofers will use the least expensive, granulated Ice & Water shield, which makes them meet the code requirement and makes you happy. Right? However, the problem with most, if not all granular surface Ice and Water shield underlayment is that:
A) they do not stick too well to the roof deck and if overlapped, to each other.
B) nails that penetrate this granulated membrane are supposed to be sealed by the asphalt base of the membrane. However, in reality the granules make the seal around the nail not perfect, and the water is still able to penetrate through the roof.
Ideally, using a smooth surface Ice and Water shield such as that made by Grace is preferred, but it is a more expensive material, compared to granular surface Ice Shield underlayment. You also want the roof pitch of your house to be over 6 in 12 inches, for the ice shield to work best.
In reality, a granular and even a smooth surface ice and water shield often fail – mostly because of the failed “seal around the nails”. This compels many homeowners to seek more advanced alternatives to fight ice dams.
Using Ice Belts To Prevent Ice Dams
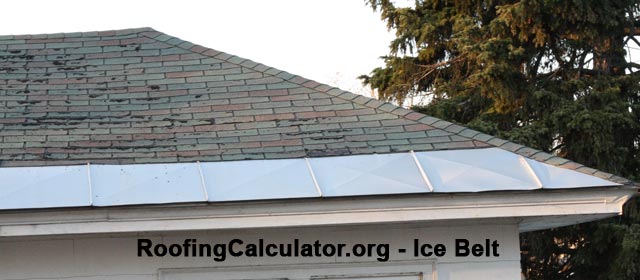
Another very good way to eliminate ice dams is to use ice belts. Ice belts are essentially flat pieces of aluminum coil installed along the roof edge, and locked together, and inserted under the overlapping course of roofing shingles, so that ice that forms along roof edge would slide off the ice belt.
While in most cases ice belts work, in some roof configurations, they are either not as effective or do not work at all. For example, if there is a roof pitch change that takes place above the ice belt, ice dams can form in that pitch change section, where there is no ice belt, so the roof still leaks. However, these are very rare cases, and unless you live deep in the snow country with extremely low temperatures and a lot of snow, an ice belt might be a very viable solution.

Using Metal Roofing To Stop Ice Dams Leaks
A metal roof is essentially an ice belt installed over the entire roof. Metal roofs, be it standing seam panels or metal shingles, will be the most effective way to stop ice dam related leaks. A metal roof will also provide a lifetime and beautiful protection for your roof, and will be the envy of your neighbors :).
Essentially, because of either seamless of interlocking design of metal roofs, which prevents water build up from penetrating under the roof, and inherent ability to shed ice and snow, the roof will not leak, even if ice dams form along the edge (for example, when a snow retention system is installed to actually hold snow from sliding off the roof).
Installing a Single Ply Flat Roofing Membrane To Eliminate Ice Dams
While a metal roof is an excellent choice of a roofing material that will not be affected by ice dams (when installed correctly), it is not always feasible to use a metal roof. For example most metal roofs are designed for installation on a minimum roof pitch of 3 in 12. If your roof has a low slope, you may still try to use a standing seam metal roof (using shingles on roofs with slope less than 3 in 12 will most likely result in roof leaks), but it may or may not work, and the roof will not be covered by warranty.
See the photograph below, were a low-slope roof was completely covered with ice & water shield, but huge ice dams still formed, and it was leaking all along the roof edge. Because of the way the house was built, improving insulation was VERY difficult and expensive, and installing adequate ventilation was nearly impossible.
The best and most permanent solution in this situation and in similar ones, where low sloped roofs are involved is to install a single ply flat roofing membrane with hot air welded or glued seams. On this particular home, a low slope PVC membrane was installed. This new roof has very few seams, which were all hot-air welded together, eliminating the possibility of any leaks. In fact, due to the slippery surface, most snow just slides off the roof, before any ice formation can occur. See a video below.
While having a flat roofing membrane is preferable, even the rubber roof with glued seams will most of the time work well, and be much more effective at preventing ice dams than an asphalt shingles roof.
Word of caution – avoid using roll roofing or any type of granular surface roofing material if you have ice dams problems. Rolled roofing fails very quickly (within 5 years of installation) and due to using tar to seal the overlaps, it will not hold off the ice dams.
Eliminate the Root Cause of Ice Dams – Improve Your Attic Insulation and Roof Ventilation
If at all possible, you should first solve the problem that causes ice dams in the first place – eliminate heat loss and improve ventilation of your attic space, so that even if hot air does leak into your attic, it could easily escape, without causing ice dams.
Insulation: Get a professional energy loss assessment or use an infrared scanner to identify where the heat escapes from your living area into your unheated attic. You can usually get one for free from your local utility company.
Install or upgrade your insulation, making sure you get it all the way toward the overhangs of your roof, but also making sure you do not block soffit vent intakes, if you have them.
If your insulation is installed between roof rafters, use special baffles, which will allow the airflow under the insulation. You should still use attic floor insulation to prevent the hot air from going into the vented attic space.
Wrap and seal all protrusions that go from your living space into your attic. If you have an attic hatch, get a special cover from the Home Depot and place it over the fold-down ladder to seal the hatch, when you leave your attic.
Ventilation: Install ridge / soffit vent combination if possible for the most efficient attic ventilation. If you already have gable vents, and are installing ridge and soffit vents, block off the gable vents, as they will short-circuit the air flow.
If using a ridge soffit vents is not possible, get static (turtle) roof vents, and place them at the ridge of your roof, as well as toward the bottom – about 3 feet above the drip-edge line. This will allow for more efficient air circulation in your attic.
Having a well working roof ventilation is essential not only to solve ice dams in the winter, but also to cool down your attic space in the summer. A hot attic will increase your cooling costs, as well as shorten the life of your asphalt shingles, by overheating and “cooking” them, which will make the shingles brittle and cause cracks, warping and premature failure.
Cold Roof – When Other Solutions To Prevent Ice Dams Are Not an Option
Finally, the most extreme way to fight ice dams, especially when you cannot do anything about improving roof ventilation, is to use a “cold roof”. This is essentially a second layer of roof sheeting installed over a vertically situated batten system, that creates a 2″ space between the original roof deck, and a new layer of roof sheeting, and allows for proper ventilation to take place.
Basically, 2×2 vertical battens are installed over the existing roof deck, space about 16″ on center, and new plywood, OSB or other type of deck is installed on top, leaving a gap where air can easily pass through, while the heat from inside your house will not leak out. A new roofing material is then installed, along with synthetic underlayment.
Cold roofs are an expensive and an extreme measure to combat ice dams. You should still improve your insulation as much as possible to reduce heat loss. A ridge / soffit ventilation system is then used to ventilate a cold roof.
Preventing Ice Dams Before They Happen
If you are building a new home, make sure your architect plans the insulation and ventilation accordingly, so that you don’t have to deal with ice dams. Choose the better roofing materials which we described above, which have an inherent ability to withstand the ice dams. Use more insulation and a better ventilation system, and you should not have any issues with ice dams.
|
Low End
$4837
Mid Range
$6046
High End
$7558
|
|
|


 See costs in your area
Pingback: HOW TO INSTALL ASPHALT ROOFING SHINGLES
Pingback: HOW TO INSTALL ROOFING SHINGLES Part 3: Preparing Roof Deck and Installing Underlayment
Pingback: Roofing guide for Homeowners – Roof Repair, Roofing Materials and Prices
Pingback: Using Roof Pitch to Choose Roofing Materials
Pingback: Metal Roofing Cost or Why are Metal Roofs so “Expensive”?
Pingback: Hiring a roofer to remove Ice Dams